 Save
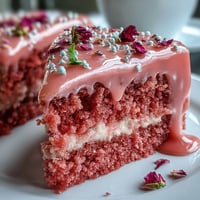
Save My cousin mentioned she was born in March, and somehow that sparked an entire afternoon of zodiac baking experiments in my kitchen. The Pisces symbol kept drawing me in—those two fish swimming in opposite directions felt like a metaphor for indecision, which honestly described my frosting color choices perfectly. I decided to channel that aquatic energy into a sheet cake with ocean waves in every shade of blue I could justify owning. The result was less mystical and more just delicious, but watching the buttercream swirls come together felt like catching something fleeting and beautiful.
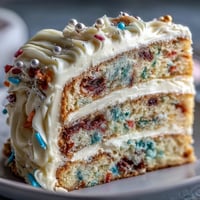
I made this cake for a friend's birthday party last spring, and the kitchen smelled like vanilla for three days afterward. People kept lingering by the cake table, not because they were hungry but because it genuinely looked too pretty to cut into. Once someone did take the first slice, though, they stopped caring about aesthetics and just wanted another piece. That's when I knew the taste matched the looks.
Ingredients
- All-purpose flour: The foundation that keeps your cake tender without being fragile, and measuring by weight here makes a real difference in consistency.
- Baking powder: Use fresh powder (check the expiration date) because old leavening agents won't give you that light, airy crumb you're after.
- Unsalted butter: Room temperature is non-negotiable—cold butter won't cream properly, and you'll end up with a dense cake instead of fluffy.
- Granulated sugar: This creams with the butter to trap tiny air bubbles that make the sponge pillowy.
- Eggs: Room temperature eggs emulsify better with the butter mixture, creating a smoother batter.
- Pure vanilla extract: The quality here shows, so don't reach for the imitation bottle if you want that subtle, sophisticated flavor.
- Whole milk: Room temperature milk combines smoothly without shocking the batter and breaking the emulsion.
- Unsalted butter for frosting: Creams into a silkier texture than salted butter, giving you control over sweetness levels.
- Powdered sugar: Sift it before measuring to avoid lumpy frosting that feels grainy on your tongue.
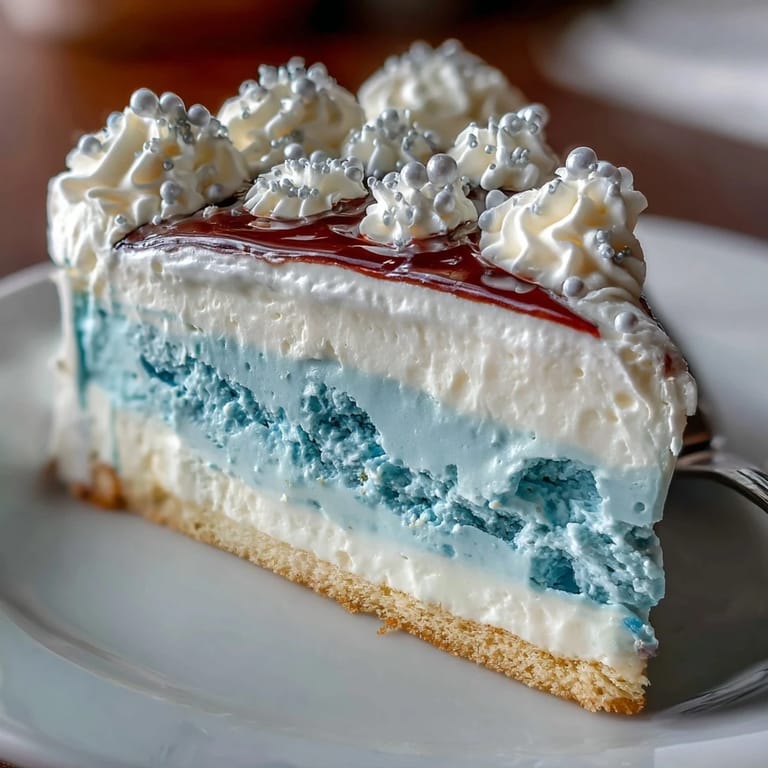
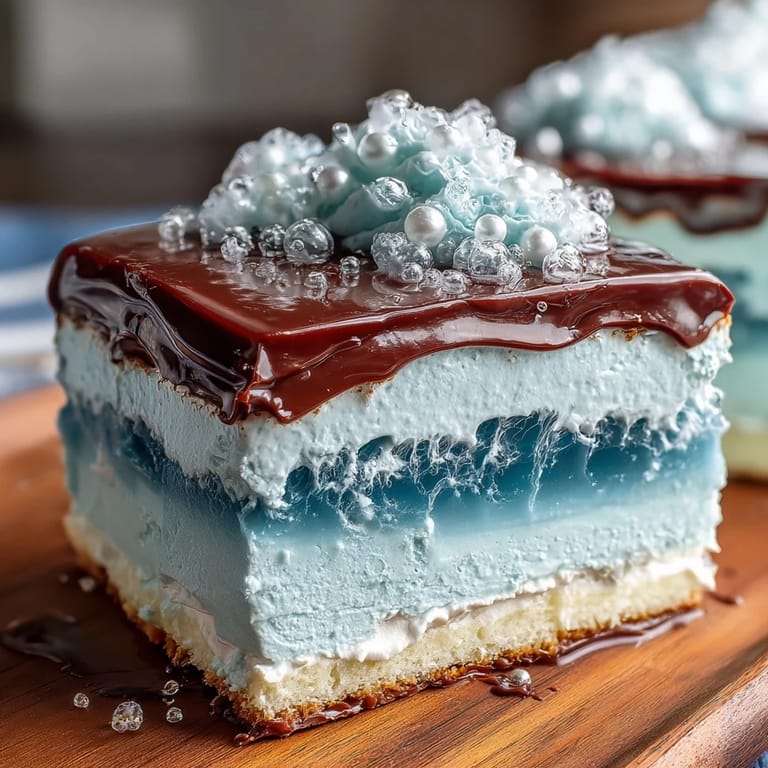
- Blue gel food coloring: Gel coloring is your secret weapon—it tints buttercream without adding moisture like liquid coloring does, and it creates those jewel-tone blues that photographs beautifully.
- White gel food coloring: Optional but helpful for creating crisp white accents and sea foam effects.
- Edible pearls: These add whimsy and catch the light like actual ocean water.
Tired of Takeout? 🥡
Get 10 meals you can make faster than delivery arrives. Seriously.
One email. No spam. Unsubscribe anytime.
Instructions
- Set Your Stage:
- Preheat your oven to 350°F while you gather everything around you—this cake rewards organization. Line your 9x13-inch pan with parchment paper that hangs slightly over the edges so you can lift the cooled cake out without wrestling it.
- Dry Ingredients:
- Whisk flour, baking powder, and salt together in a medium bowl until they're evenly combined and there are no flour pockets hiding in the corners. This step prevents dense spots in your finished cake.
- Cream Butter and Sugar:
- In your large bowl, beat room-temperature butter and sugar together for about three minutes until the mixture looks pale, fluffy, and noticeably lighter than when you started. This creaming step is where the magic happens—you're literally whipping air into the butter.
- Add Eggs Gradually:
- Crack each egg into the mixture one at a time, beating well after each addition so they fully incorporate instead of creating little egg pockets. This patience pays off in texture.
- Flavor and Combine:
- Beat in your vanilla extract, then alternate adding the flour mixture and milk, starting and ending with flour. Mix until just combined—overmixing at this stage develops gluten and toughens your cake.
- Into the Oven:
- Pour the batter into your prepared pan and smooth the top gently with a spatula. Bake for 28-32 minutes, checking around the 25-minute mark by inserting a toothpick in the center—it should come out clean or with just a few crumbs clinging to it.
- Cooling Down:
- Let the cake rest in the pan for about ten minutes (this prevents it from falling apart), then turn it out onto a wire rack to cool completely. Patience here is essential—frosting a warm cake leads to melted, slippery frosting.
- Buttercream Base:
- Beat room-temperature butter on medium speed for two minutes until it's pale and creamy, then gradually add your sifted powdered sugar on low speed to avoid a sugar cloud covering your kitchen. Add vanilla and milk, then beat until the frosting is fluffy and spreadable.
- Color Your Ocean:
- Divide your buttercream into three or four bowls and tint each with gel food coloring in varying shades—deep ocean blue, medium aqua, pale sky blue, and white. Gel coloring gives you intense, beautiful colors without thinning your frosting.
- Crumb Coat:
- Spread a thin layer of white buttercream over the entire cooled cake to seal in any crumbs, then refrigerate for twenty minutes. This crumb coat prevents dark frosting from looking speckled when you apply your ocean waves.
- Wave Application:
- Using an offset spatula, layer your blue buttercreams in sweeping, wave-like motions across the cake, starting with the darkest shade at the base and transitioning to lighter blues as you move upward. Think of the motion as painting rather than spreading—swooping movements create that authentic ocean feel.
- Sea Foam Finish:
- Pipe or swirl white buttercream on top of your waves to mimic sea foam and breaking water. This white layer brings the whole design together and makes the blue shades really pop visually.
- Optional Embellishments:
- If you're adding edible pearls or a Pisces symbol made from fondant or white chocolate, press these gently onto the frosting while it's still slightly soft so they stick without sinking.
 Save
Save The moment that made this cake special wasn't about zodiac signs or color theory—it was watching my friend's face when she saw it and forgot for a second that it was actually edible. She just stared at the waves, and someone said, "It looks like the ocean," which felt like the highest compliment. That's when I realized edible doesn't have to mean boring or forgettable.
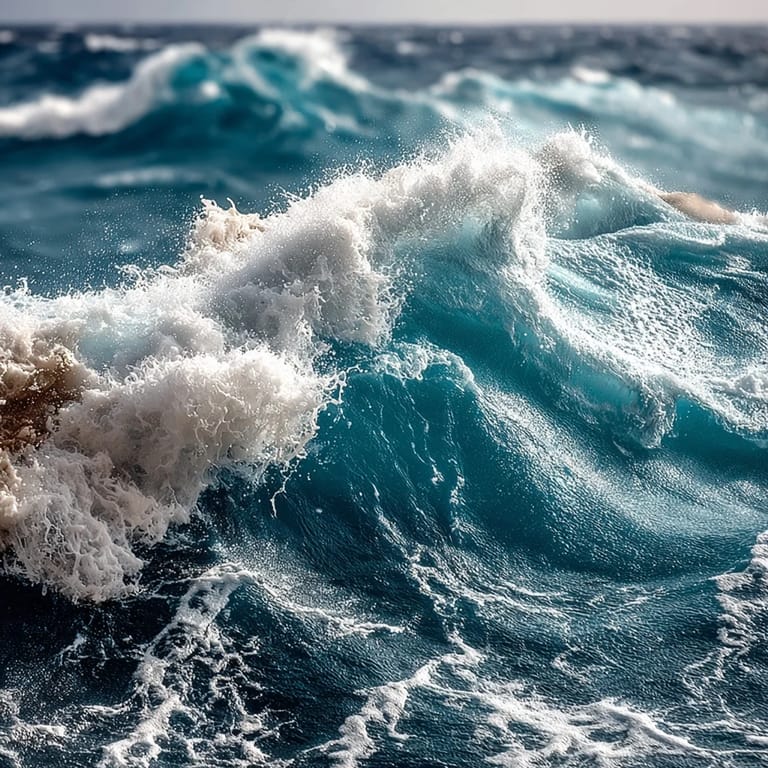
The Science of Ombré Frosting
Ombré works on sheet cakes because you're building layers of color gradually, allowing your eye to follow the transition from deep to light. The trick isn't complicated—it's about patience and letting each shade overlap slightly with the next one. I learned this by watching YouTube videos at midnight before attempting it, then discovering that my hasty approach created muddy colors instead of a clean gradient. The second attempt, where I actually planned which shades would sit where, transformed the whole aesthetic.
Why Vanilla Sponge Over Chocolate
Vanilla sponge lets the buttercream colors be the star instead of competing with dark cake crumbs visible through white frosting. It also absorbs the blue shades beautifully if any frosting seeps into small cracks, whereas chocolate cake shows every imperfection. Plus, vanilla pairs perfectly with the subtle sweetness of this particular buttercream ratio—chocolate would have fought for attention.
Decorating Timing and Temperature
The magic window for decorating this cake is when it's cold but not rock-hard—take it out of the fridge about five minutes before you start piping. If it's too cold, the buttercream won't adhere and you'll be fighting frustration; if it's too warm, you're just moving frosting around instead of creating defined waves. I've done both wrong and learned to work strategically, focusing on one section at a time and letting the whole cake chill between major steps.
- Chill the cake for twenty minutes between the crumb coat and the wave application so your base layer sets properly.
- Have all your buttercream colors ready in piping bags before you take the cake out of the fridge—you won't have time to fiddle with colors once you've started.
- Work from darkest to lightest shade so you can blend colors where they meet without muddy transitions.
 Save
Save This cake transformed from a whimsical idea into something that actually tastes as good as it looks, which is rarer than you'd think. Make it when you have time to enjoy the decorating process instead of rushing through it.
Recipe FAQ
- → What makes the sponge moist and tender?
Using room temperature butter and eggs, along with balanced flour and liquid ratios, creates a tender crumb. Beating the butter and sugar until fluffy helps incorporate air for softness.
- → How is the blue ombré effect achieved in the frosting?
The buttercream is divided into several portions, each tinted with increasing intensities of blue gel food coloring, then layered from darkest at the base to lightest atop.
- → What techniques create the ocean wave frosting patterns?
Using an offset spatula and piping bags with round or petal tips, the buttercream is swooped and layered in wave-like shapes, topped with white swirls resembling sea foam.
- → Can this be made ahead of time?
Yes, baking and initial cooling can be done earlier. Buttercream layers benefit from chilling between applications for clean lines and easier handling.
- → Are there any suggested decorations to enhance presentation?
Optional additions include edible pearls and a white chocolate or fondant Pisces symbol, adding thematic and visual interest to the finished cake.